
Optimizing your time as a Flutter Developer with Live Templates
When we start developing our apps in a new language and new technology, we take pride in every keystroke we make. We are learning, we want to know how things work, so we write countless times the same thing over and over again. But after the 100th StatefulWidget, we start wondering if there is a better and faster way to create both the widget and its state.
And here is where Live Templates come to save our lives.
A Live Template is basically a template that we can use for various tasks, like for loops, creating Widgets, variable declarations and common class declarations. In fact, some of these are already in IntelliJ, like iter for iterating in a list of objects.
To test it out, inside a function we type in iter, click enter, and start typing in each variable. To navigate to the next variable, we click on the tab bar.
By going go the Android Studio Preferences (cmd , on Mac and Control + Alt + S on Windows) and searching for Live Templates we can see a list of all the available templates for each language or technology.
To start with a simple example, we open the Dart live templates and search for iter.
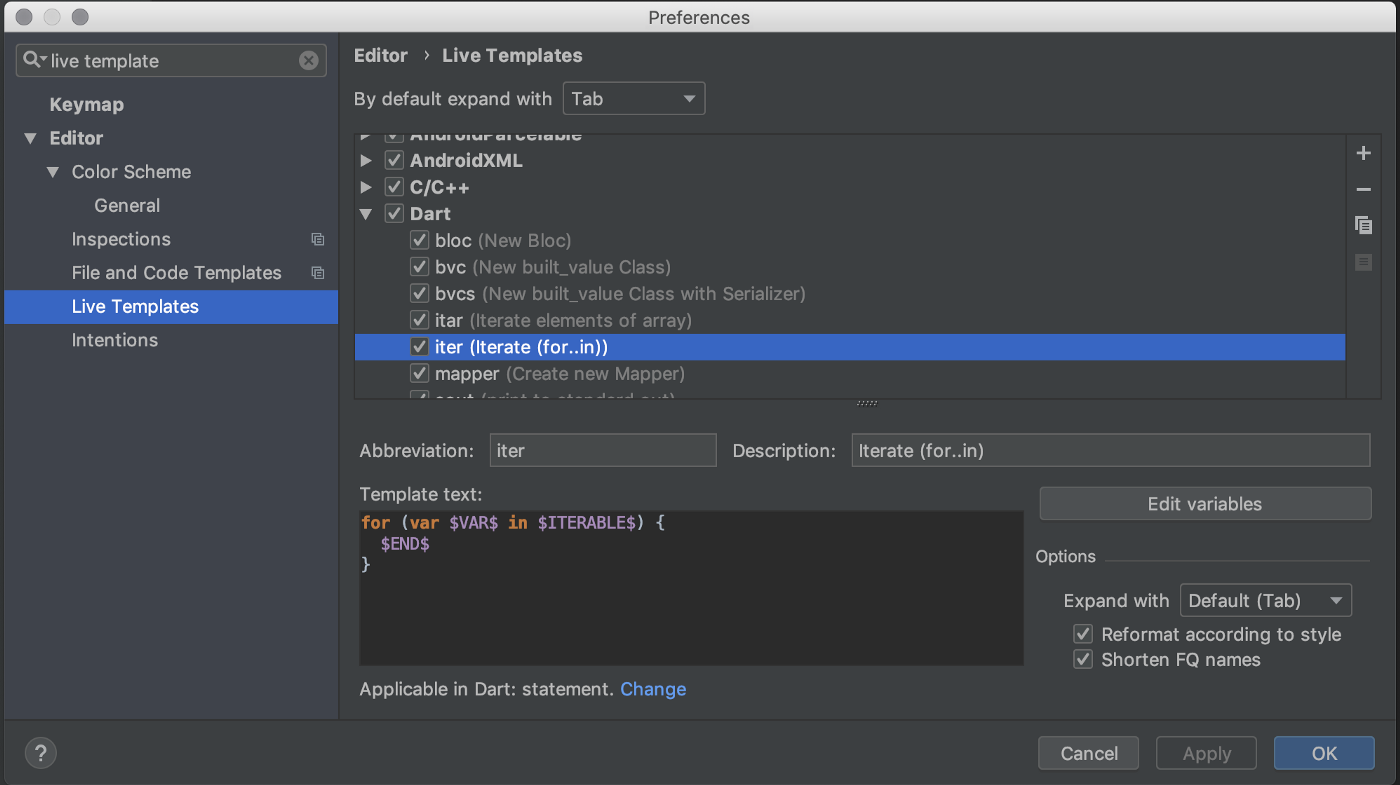
As we can see, we have:
- An abbreviation, to be used to “call” the template, in this case it’s
iter - A description to show the user what this Live Template will do
- A snippet of code
- A button called “Edit Variables”
- Miscellaneous options.
For now, we’ll focus on the code snippet for this example:
for (var $VAR$ in $ITERABLE$) {
  $END$
}
In this code snippet, we have a for-each loop made in dart with 3 variables. Each variable is inside two $ symbols, with their name in upper-case and we can see that one of them is called END$, which is a variable to set the place for the cursor after the user finishes using the Live Template.
Creating a Live Template for StatefulWidgets
So how can we make a live template?
Taking as an example the StatefulWidget, (let’s forget that Flutter already has a Live Template for it with the keywords stful) I suggest that we start by creating by hand.
class LiveWidget extends StatefulWidget {
  @override
  State<LiveWidget> createState() {
    return _LiveWidgetState();
  }
}

class _LiveWidgetState extends State<LiveWidget> {
  @override
  Widget build(BuildContext context) {
    // TODO: implement build
    return null;
  }
}
The name LiveWidget is present in both the class declaration and the in part of the _LiveWidgetState name, so we can easily state that LiveWidget is a variable. Since our variables will need to be inside two $, we can name it $CLASS_NAME$.
We then need to change all places where the class name appears:
- The
StatefulWidgetclass name - The
createStatereturn type - The
Stateclass name - The
Stateextended type
class $CLASS_NAME$ extends StatefulWidget {
  @override
  State<$CLASS_NAME$> createState() {
    return _$CLASS_NAME$State();
  }
}

class _$CLASS_NAME$State extends State<$CLASS_NAME$> {
  @override
  Widget build(BuildContext context) {
    // TODO: implement build
    return null;
  }
}
Let’s open again the Live Template preferences and add it there
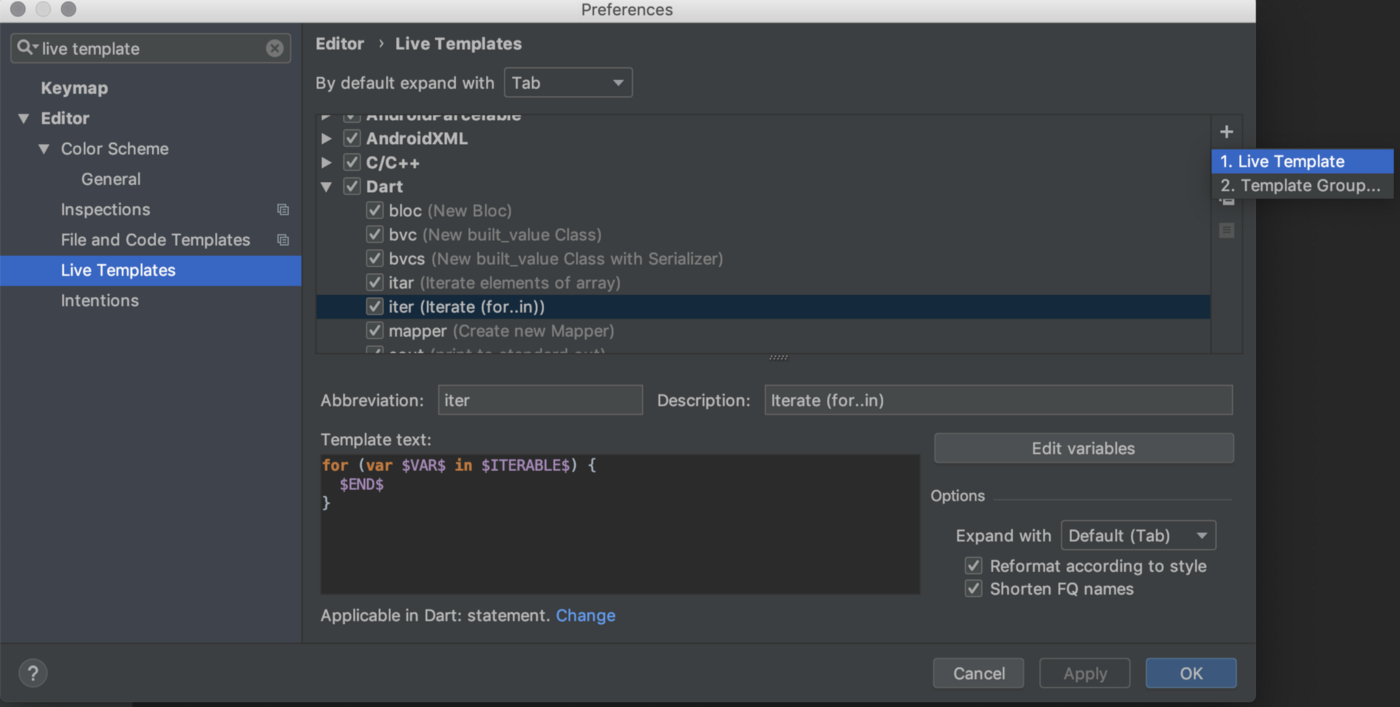
In the newly created template, we will need to fill in each field:
- For the abbreviation, I chose
statewidget - A small description for the template could be
Creates a stateful widget - Finally, we must paste our code snippet
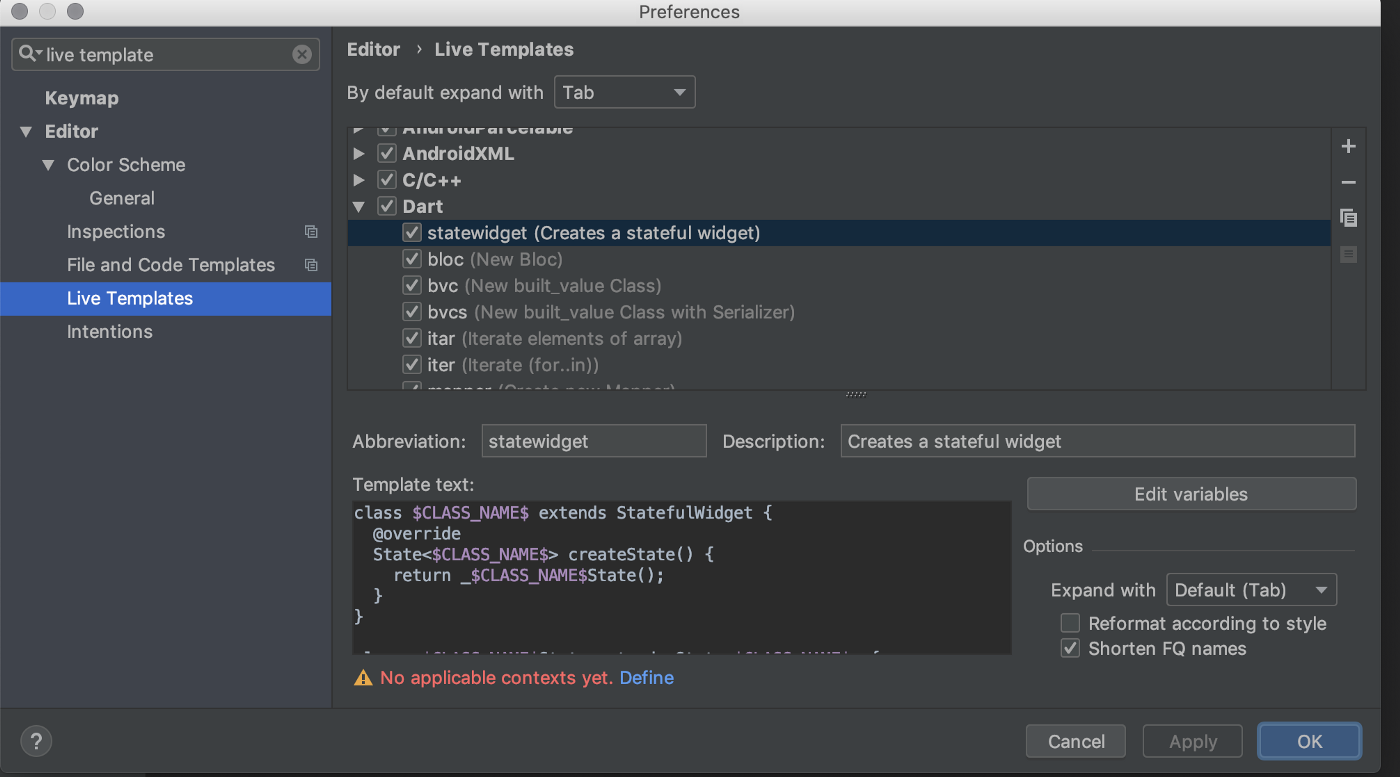
However we can see an error message in the bottom of the screen: “No applicable contexts yet”. If we click on define, we are prompted with a list of languages with the subcategories Statement, Top-level and Other.
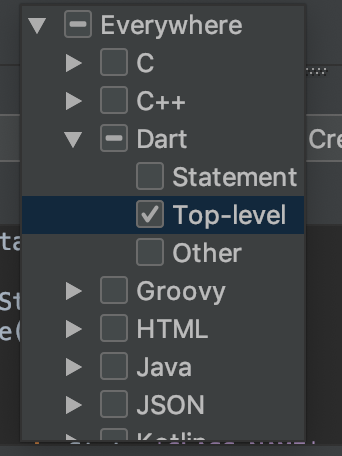
Since we want to do a class declaration, we will want our Live Template to only be available at Top Level, and so we choose that option.
And that’s it! We can now click apply and start testing our live template!
We create a new file, we test out the template by typing in the abbreviation, we fill in the class name and…!
We got undefined class errors.
To solve this, we must edit our Live Template to also import from flutter/material, in case we are using Material Widgets.
import 'package:flutter/material.dart';

class $CLASS_NAME$ extends StatefulWidget {
  @override
  State<$CLASS_NAME$> createState() {
    return _$CLASS_NAME$State();
  }
}

class _$CLASS_NAME$State extends State<$CLASS_NAME$> {
  @override
  Widget build(BuildContext context) {
    // TODO: implement build
    return null;
  }
}
And now, finally we get everything working in order!
State
The next step would be removing the null return from the buildmethod and putting in the $END$ variable as we saw with the iter example, so that we can start writing the widget code directly:
import 'package:flutter/material.dart';

class $CLASS_NAME$ extends StatefulWidget {
  @override
  State<$CLASS_NAME$> createState() {
    return _$CLASS_NAME$State();
  }
}

class _$CLASS_NAME$State extends State<$CLASS_NAME$> {
  @override
  Widget build(BuildContext context) {
    // TODO: implement build
    return $END$;
  }
}
Advanced usage: Creating a template for built_value classes
For a more complex example, let’s take a look into built_value classes.
In order to serialise and deserialise our classes with built_value, we need to create some boilerplate code:
import 'package:built_value/built_value.dart';
import 'package:built_value/serializer.dart';

part 'data_class.g.dart';

abstract class DataClass implements Built<DataClass, DataClassBuilder> {
  DataClass._();

  static Serializer<DataClass> get serializer => _$dataClassSerializer;

  factory DataClass([updates(DataClassBuilder b)]) = _$DataClass;
}
However, it is not straightforward creating this Live Template:
- We have the
file nameinpart 'data_class.g.dart'; - When declaring the serializer, we need to declare it as
_$dataClassSerializer, and as we can see, it camel casesDataClassin order to createdataClass
Is there a way to fix this?
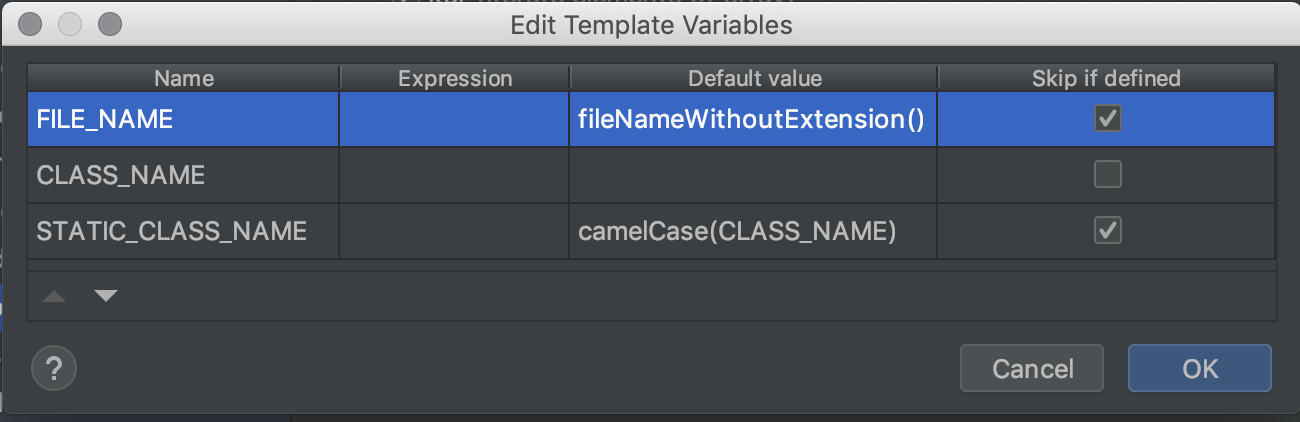
If we look into our previous example, in the Live Template settings window, we have a button called Edit Variables with several options available
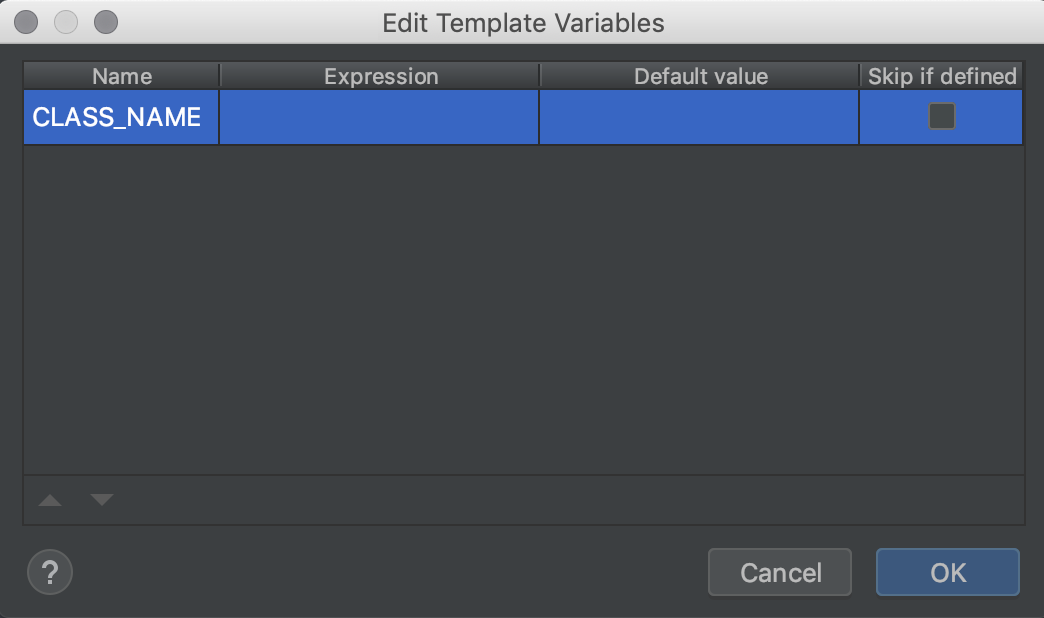
Name- the name of the variable that we created. Each time we create a new variable, a row is automatically created here with its nameExpression- a set of expressions that can be applied to our variable, such ascamelCase,date,userandfileNameWithoutExtensionDefault Value- a value that is set by default but can be edited by the user afterwards. The interesting part here is that we can reference other variables hereSkip if defined- If the value is already defined by aDefault Value, then we can skip it.
How can this help us?
First, we will need to declare a new variable for part called $FILE_NAME$. As the default value, we need to use the Expression fileNameWithoutExtension, and, since we don’t want this variable to be edited by the user, we check the Skip if needed checkbox.
Then, in your code, declare the $CLASS_NAME$ variable so that it automatically appears in the variables window. This will be used to create our last variable, $STATIC_CLASS_NAME$. This variable will use a default value that will combine the Expression camelCase and the variable CLASS_NAME: camelCase(CLASS_NAME). As with the first variable, the user won’t edit this variable, so we check the Skip if needed checkbox.
As a side note, since built_value uses a variable name with the character $, it must be declared as $$, so, for the STATIC_CLASS_NAME we declare _$$$STATIC_CLASS_NAME$Serializer.
We end up with the following live template:
import 'package:built_value/built_value.dart';
import 'package:built_value/serializer.dart';

part '$FILE_NAME$.g.dart';

abstract class $CLASS_NAME$ implements Built<$CLASS_NAME$, $CLASS_NAME$Builder> {
  $CLASS_NAME$._();

  static Serializer<$CLASS_NAME$> get serializer => _$$$STATIC_CLASS_NAME$Serializer;

	$END$

  factory $CLASS_NAME$([updates($CLASS_NAME$Builder b)]) = _$$$CLASS_NAME$;
}
And so, we can test it:

Recap and Future Possibilities
We finished our shallow dive into Live Templates! 🥳
But what other uses will we have for it?
Try to look at your codebase and see what boilerplate you need to write and write again. I’ll give you some more examples from my projects:
- Declaring RxDart
Subjects and the neededSinkand/orStream - Variables used in
intltranslation package - Creating a bloc by extending a
BaseBlocwith the necessary constructor - Creating mapper classes
I’m curious, what are you going to use it for?
Want to get the latest articles and news? Subscribe to the newsletter here 👇
And for other articles, check the rest of the blog! Blog - Gonçalo Palma