
Using Google Sheets as a Backend Solution for our Flutter Apps
Photo by Mika Baumeister on Unsplash
There are countless solutions that we can use as a backend in our Flutter applications - from Google’s Firebase, to Supabase to even creating your custom backend with Ruby on Rails, Django and many other frameworks. But sometimes, we may need something more simple, that we can easily manipulate in real-time and derive results such as graphs and arithmetic operations from the data. something that we often do in Excel-like applications.
Which takes us to the question of this article - if Google Sheets is used as a real-time collaboration tool, why not use it as a simple solution backend solution for our apps?
How would it work?
Most apps that interact with a REST API in the backend have the same flow:
- A user authenticates;
- When authenticated, a user has a set of permissions, for example, a simple user can read and write posts, while an admin has permission to delete posts;
- The backend only allows the operations if it matches the user’s permissions for that action.
The role of user permissions makes it so that we as admins can add content to the application such as sponsored posts or making special announcements that are visible to all users, or moderate user’s content so that we can easily delete content that violates our rule of conduct.
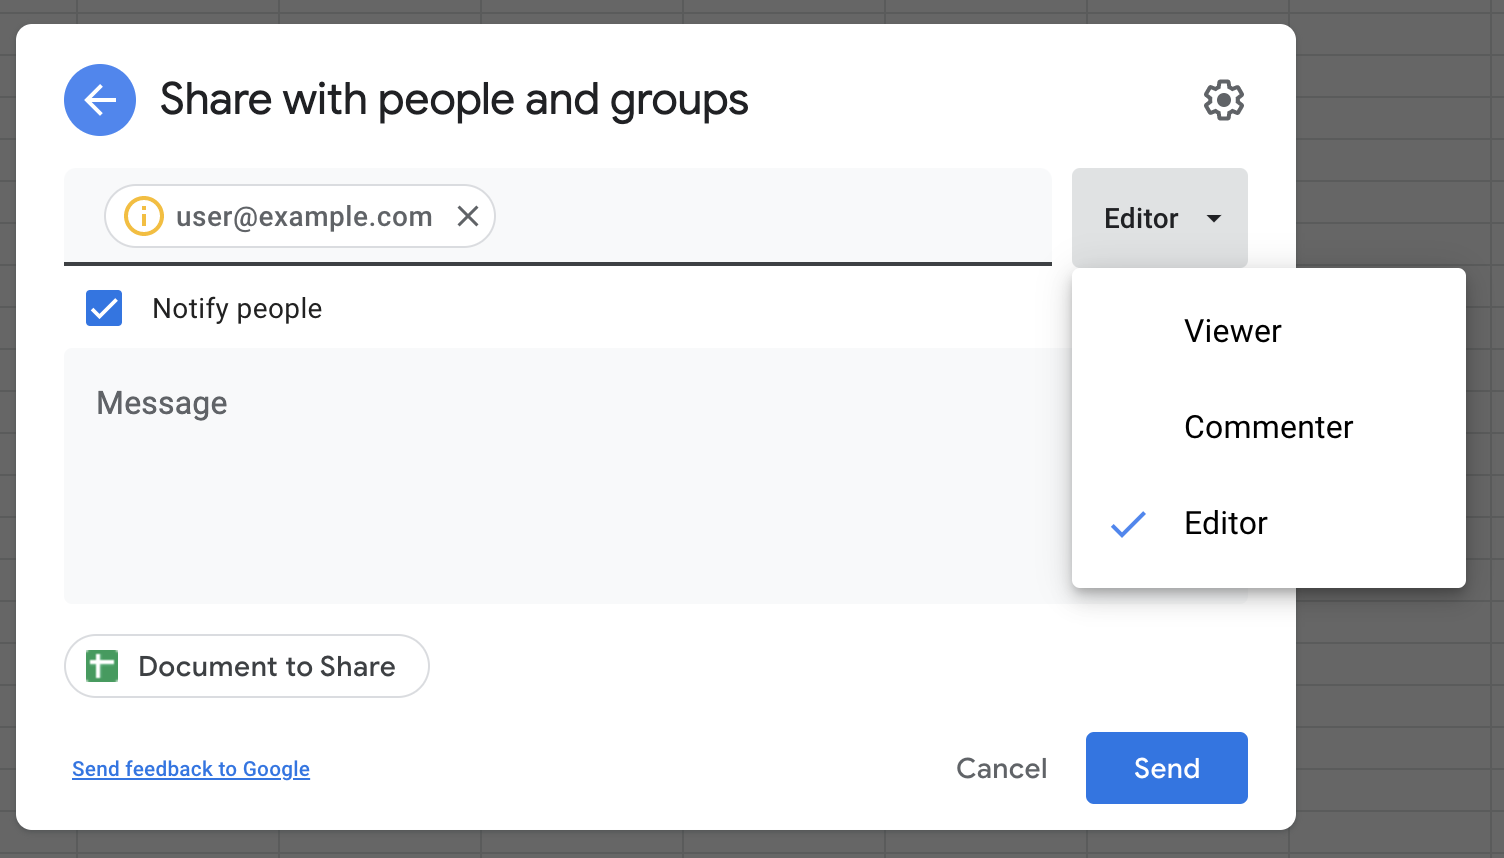
Moving over to how we work in Google Sheets, if we need to collaborate with someone, we follow a similar flow:
- Create a new Google Sheet;
- Add a user via e-mail;
- Set a role for that user - viewer, commenter, or editor.
This means, that, just like other backend applications, our data can have different sets of permissions such as read and read and write.
Analogous to Firebase where we have different collections, we could have different excel files with different permissions:
- One excel file would host read-only data that could be edited only by us;
- Another excel file would be open to view and edit by other users.
So now that we in theory know how a backend-like structure with Google Sheets looks like, one questions remains - if when we are collaborating with another user, we need to share the Google Sheet file to that user’s email address, do we need to ask for all of our user’s emails and add them to our Google Sheets?
The answer is no - in order to manipulate our Google Sheets document we can use a special kind of account called Service Account.
According to Google Cloud documentation, a Service Account is:
[A] special type of Google account intended to represent a non-human user that needs to authenticate and be authorized to access data in Google APIs
This is an account created automatically by the Google Cloud Console, upon our request, that has access to all the APIs we added to the project, such as Google Drive and Google Sheets. With those permissions, it would be able to act on behalf of the user to access the Sheets file and view and manipulate data from that file.
To create the Service Account you can follow this article: How To Get Credentials for Google Sheets | by Alexander Marenkov.
The gsheets library
Google provides a REST API to interact with Google Sheets directly, but thankfully we already have a library that handles the API - gsheets.
To work with this library we’ll need 2 things:
- A service account;
- A Google Sheets file URL.
The Google Sheets URL will give us two very important parameters - the sheetsId and the worksheetId:
https://docs.google.com/spreadsheets/d/<sheet id>/edit#gid=<worksheet id>
For the URL https://docs.google.com/spreadsheets/d/1i_yE2ITvvI2CFCoKEUD-_4NRJoBFk62yM0AOIVTZojc/edit#gid=757190290:
sheets id-1i_yE2ITvvI2CFCoKEUD-_4NRJoBFk62yM0AOIVTZojc;worksheet id-757190290.
With these two parameters we can now initialise the library:
void main() {
	/// [credentials] is a String with the JSON values for the Service Account
  final gsheets = GSheets(credentials);
  final sheet = await gsheets.spreadsheet(sheetsId);
  var workSheet = ss.worksheetById(worksheetId);
}
And now we have finally access to our worksheet!
Retrieving values from Google Sheets
For this article, let’s create a simple spreadsheet that has the following data:
| Name | Address |
|---|---|
| Villa Mascarada | Rua de Luís de Camões, nº 22, Alcabideche |
| Mansão Verde | Avenida de Tóquio, nº 7, Porto |
| Casa de Repouso | Rua do Descanso, nº 99, Santiago do Cacém |
To access the values of a worksheet, the WorkSheet class has a convenient attribute - values. Inside it, we have a lot of convenient functions that we can use, such as allRows(). This function returns us a List<List<String>> from which we can get the values for all rows:
Future<List<List<String>>> getHouses() {
   return _worksheet.values.allRows();
}
If we print the previous function result, we will have the following:
[
	[Name, Address],
	[Villa Mascarada, Rua de Luís de Camões, nº 22, Alcabideche],
	[Mansão Verde, Avenida de Tóquio, nº
7, Porto],
	[Casa de Repouso, Rua do Descanso, nº 99, Santiago do Cacém]
]
However, if our objective is to show all entries to the user in the form of a list of cards, we won’t need to display the first line of the Google Sheets document - Name and Address, so we can easily skip that line by using the skip function:
Future<List<List<String>>> getHouses() {
   return _worksheet.values.allRows().skip(1).toList()
}
This will return exactly the result that we want:
[
	[Villa Mascarada, Rua de Luís de Camões, nº 22, Alcabideche],
	[Mansão Verde, Avenida de Tóquio, nº
7, Porto],
	[Casa de Repouso, Rua do Descanso, nº 99, Santiago do Cacém]
]
Next, to make it easier to use this data in our app, let’s create a simple class called HouseEntity that has the attributes name and address:
class HouseEntity {
  final String name;
  final String address;

  HouseEntity({
    required this.name,
    required this.address,
  });
}
Since we are going to create this object from a List<String> that comes back from Google Sheets, we can add a new factory:
class HouseEntity {
  final String name;
  final String address;

  HouseEntity({
    required this.name,
    required this.address,
  });

  factory HouseEntity.fromSheets(List<String> input) =>
      HouseEntity(name: input[0], address: input[1]);
}
This way we can now easily convert our getHouses function to return a List<HouseEntity>, that is more easily digested by our UI code:
Future<List<HouseEntity>> getHouses() async {
  /// skips the first value which is the header
  final values = (await _worksheet.values.allRows()).skip(1).toList();
  return values.map((value) => HouseEntity.fromSheets(value)).toList();
}
Adding new entries
To add new entries, we use again the worksheet’s value attribute, but this time we use another function: appendRow.
The same way that when we retrieve all the rows from Google Sheets, each row will be a List<String>, adding a row will also require us to send a List<String>:
Future<bool> addHouse(String name, String address) {
  return _worksheet.values.appendRow([name, address]);
}
Deleting Rows
Finally, we can delete rows as simply as we add them, the only difference is that we are going to provide the index of the row.
However, we must be aware of two things:
- In Google Sheets, the index number starts at 1;
- We skipped the first row so that we don’t show the worksheet’s header.
This means that if we are presenting all of our values in a ListView.builder, for example, and we use the index to delete a specific row, then we will need to add 2 to that same index:
Future<bool> deleteHouse(int index) {
  /// We add one to the index so that we can:
  /// 1. Start at index 1
  /// 2. Skip the first row
  return _worksheet.deleteRow(index + 2);
}
Putting it all together - Houses App
Now that we at least know how to read, delete and add data to Google Sheets, let’s put it all together in a simple application - a Housing application that displays a list of houses’ names and addresses.
We can see the list of all the houses, with the ability to delete them:

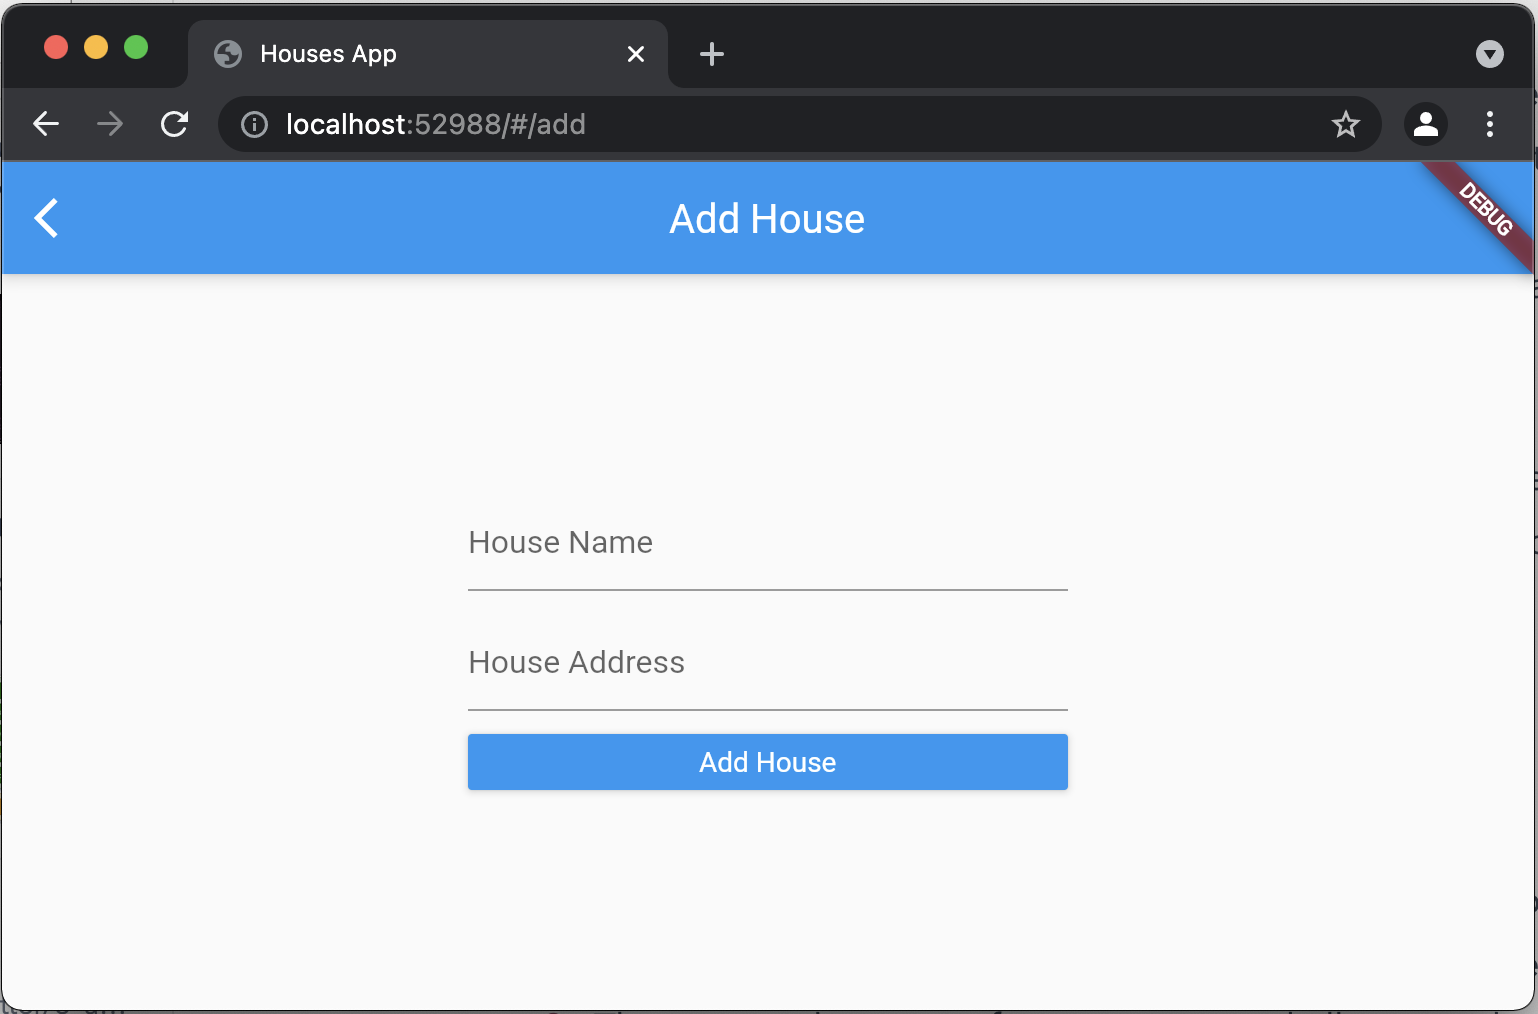
And we can also add a new house:
The first thing that we will do is to create a GoogleSheetsProvider class where we add all the methods we discussed before. Additionally, we add an initializeForWorksheet method so that we can access a specific worksheet inside a Google Sheet document:
class GoogleSheetsProvider {
  final GSheets _gsheets;

  late Worksheet _worksheet;

  GoogleSheetsProvider(String credentials) : _gsheets = GSheets(credentials);

  Future<void> initializeForWorksheet(
      String spreadsheetId, String worksheetTitle) async {
    final excel = await _gsheets.spreadsheet(spreadsheetId);

    _worksheet = excel.worksheetByTitle(worksheetTitle)!;
  }

  Future<List<HouseEntity>> getHouses() async {
    /// skips the first value which is the header
    final values = (await _worksheet.values.allRows()).skip(1).toList();
    return values.map((value) => HouseEntity.fromSheets(value)).toList();
  }

  Future<bool> deleteHouse(int index) {
    /// We add one to the index so that we can:
    /// 1. Start at index 1
    /// 2. Skip the first row
    return _worksheet.deleteRow(index + 2);
  }

  Future<bool> addHouse(String name, String address) {
    return _worksheet.values.appendRow([name, address]);
  }
}
With this out of the way, we can now focus on listing all of our entries, and for that, we’re going to use two widgets: FutureBuilder and ListView.builder:
class HomePage extends StatefulWidget {
  final GoogleSheetsProvider provider;
  const HomePage({
    required this.provider,
    Key? key,
  }) : super(key: key);

  @override
  _HomePageState createState() => _HomePageState();
}

class _HomePageState extends State<HomePage> {

  @override
  Widget build(BuildContext context) {
    return Scaffold(
      appBar: AppBar(
        title: const Text('Houses'),
      ),
      body: FutureBuilder<List<HouseEntity>>(
        future: widget.provider.getHouses(),
        builder: (context, snapshot) {
          if (!snapshot.hasData) {
            return const Center(
              child: CircularProgressIndicator(),
            );
          }

          final houses = snapshot.data!;

          return Padding(
            padding: const EdgeInsets.all(24.0),
            child: ListView.builder(
                itemCount: houses.length,
                itemBuilder: (context, index) => HouseCard(
                      name: houses[index].name,
                      address: houses[index].address,
                      onDelete: () async {
                        await widget.provider.deleteHouse(index);
                      },
                    )),
          );
        },
      ),
      floatingActionButton: FloatingActionButton(
        onPressed: () async {
          await Navigator.of(context).pushNamed(routeAdd);
        },
        child: const Icon(
          Icons.house,
          color: Colors.white,
        ),
      ),
    );
  }
}
There’s a final question - how can we keep our app synchronized with Google Sheets every time we do an action such as adding a new entry via the new route routeAdd or deleting a specific house?
For that we’ll need to:
- Modify our code so that instead of using a
Futuredirectly from theGoogleSheetsProviderclass, it’s going to call agetter that we create inside ourState; - Each time that we perform an action - addition or deletion, we’re going to call
setState(() {})so that ourFutureBuilderrebuilds and calls the functionwidget.provider.getHouses()again
class HomePage extends StatefulWidget {
  final GoogleSheetsProvider provider;
  const HomePage({
    required this.provider,
    Key? key,
  }) : super(key: key);

  @override
  _HomePageState createState() => _HomePageState();
}

class _HomePageState extends State<HomePage> {

  Future<List<HouseEntity>> get houses => widget.provider.getHouses();

  @override
  Widget build(BuildContext context) {
    return Scaffold(
      appBar: AppBar(
        title: const Text('Houses'),
      ),
      body: FutureBuilder<List<HouseEntity>>(
        future: houses,
        builder: (context, snapshot) {
          // ...

          return Padding(
            padding: const EdgeInsets.all(24.0),
            child: ListView.builder(
                itemCount: houses.length,
                itemBuilder: (context, index) => HouseCard(
                      name: houses[index].name,
                      address: houses[index].address,
                      onDelete: () async {
                        await widget.provider.deleteHouse(index);

                        /// should call again the getter
                        setState(() {});
                      },
                    )),
          );
        },
      ),
      floatingActionButton: FloatingActionButton(
        onPressed: () async {
          await Navigator.of(context).pushNamed(routeAdd);

          /// should call again the getter
          setState(() {});
        },
        child: const Icon(
          Icons.house,
          color: Colors.white,
        ),
      ),
    );
  }
}
And with this, we have a simple application that is in sync with our Google Sheets backend:
Conclusion
As we’ve seen, it’s fairly easy to create a small application that can connect to Google Sheets and do CRUD operations via a Service Account.
The gsheets library makes it easy to manipulate Sheets files, and we haven’t discussed other topics such as creating new worksheets, using formulas to extract results from our data, or updating our data.
However, some slight concerns can come from using this solution tied to security:
- As we’ve shown in the example, the service account can manipulate all of the data in the spreadsheet, which means that we can update rows that we’d prefer to be locked, or we can delete all the data;
- Since we are exposing our
credentialsfor the Service Account, along with ourworksheetIdandsheetsId, this means that it’s easy for an attacker to retrieve all this information and gain access to our database and manipulate it as she wishes.
Both of these concerns can be addressed if we:
- Create a simple backend application that stores the credentials and exposes some endpoints to us, or;
- Use Cloud Functions to achieve the same result.
Of course, these concerns disappear if we stipulate that our application is going to be deployed locally and only used by a trusted number of users.
If you enjoyed the article, please feel free to share it over on Twitter, and follow me @GonPalma.
To see the full Flutter Project for this article check the following Github Repository 👇 https://github.com/Vanethos/flutter-google-sheets-api
And for other articles, check the rest of the blog! Blog - Gonçalo Palma
Want to get the latest articles and news? Subscribe to the newsletter here 👇
And for other articles, check the rest of the blog! Blog - Gonçalo Palma