GitHub Actions – Ensuring Quality in our Flutter Codebase
Photo by Yancy Min on Unsplash
There comes a time when, after creating a couple of Flutter applications or after hearing repeated customer complaints, we start thinking that caring about our code integrity might be a good idea. We start by defining different linting rules, adding dozens of tests so that we can state that our application works smoothly, and we commit ourselves to run them before we open a new PR. However, one day we get a tighter deadline, or a new developer joins the team, and someone forgets to run the test suite on the app, or worse, code that is not compilable is merged in the main git branch, leading to dozens of errors and hours of debugging our app to make it compilable again.
What went wrong?
We had an action that we were meant to perform - running tests on each PR to validate the integrity of the code and running static analysis - but since it was done manually, it was prone to issues, such as the developer forgetting to run the tests or even committing the code when knowing that there are outstanding issues. This means there is no guarantee that the codebase we are working on is stable.
If we have a task repeated every time a trigger occurs (such as opening a new PR), we might consider automating it. A methodology known as Continuous Integration (CI) aims to solve the issue by running an automated test suite and verifying specific parameters, such as code formatting and lint analysis, before allowing developers to merge their code, among other key directives. Since it is automated, anytime the new PR has side effects that break part of the codebase, the developer needs to fix it for the PR to be mergeable.
Many products aim to provide us with a CI Pipeline for our projects, from the ones targeted to Flutter, such as CodeMagic, to custom CI Pipelines in which we must prepare for each new technology, such as Jenkins or Tekton. In this article, we will explore GitHub actions that, although they still need to be prepared to be used as solutions such as CodeMagic, are easier to set up than Jenkins and let us easily customize the pipeline as we need.
Understanding Automation in Github Action
GitHub Actions provides a blank canvas with a freshly installed OS, where we can install any needed compilers, languages, and tools to achieve our goals. Furthermore, it allows us to create different automation comprised of a series of actions using the following terminology:
workflow- defines a set of automation that we will perform alongside an event that triggers the workflow. This event can be agit pushto a particular branch, creating a PR, or someone changing the status of the PR to approved;job- is a specific automation, for example, running tests for a Flutter application, and is composed of a series of actions calledsteps. For each job, we can specify the OS it is running on. We can add a conditional statement to run the job only if a particular scenario is met and define environment variables;step- it’s a specific action inside a job. It can have aname, and an action associated with it, such as a simplerun, where we execute a shell command, or auses, which imports and executes a pre-defined workflow that we can find in the GitHub Actions Marketplace (you can think of it as libraries that we can use on GitHub Actions).on- when the event is going to be triggered. It can be triggered when anygit pushis performed, or we can specifypushon a specific branch (eg.main). But it can also be triggered by the change of status of a Pull Request, adding a new issue, and many others specified in the Workflow Event Triggers page.
The workflow is defined as a YAML file inside the .github/workflows folder. Each project can have multiple workflow files, each with a yml extension. These files will let us configure the name, event trigger, and the different jobs, as seen in the following example.
# The name of the workflow
name: first-test

# The event that triggers the workflow
on: [push]

jobs:
  analysis:
    # The name of the job
    name: example
    runs-on: ubuntu-latest
    steps:
      - name: Echo Folder Contents
        run: echo $(ls)
This simple automation will print the contents of the GitHub action work directory every time a user pushes into the repository on any branch. Furthermore, it performs the commands in a fresh install of the latest Ubuntu release.
But if we run our automation on a fresh OS image, how can we compile, test and deploy a specific technology such as Flutter? First, we need to take a step back and go through the installation and setup of each tool required.
Fresh OS - Setup and Configurations
For automation to work, we must carefully consider what is needed to run a Flutter application on a computer. Since we are using a Linux-based image, we can look at the Linux Installation guide for Flutter, where we see that a series of steps are needed to install Flutter:
- We need to have an environment with access to commands such as
zip,rm, andwhich; - Install Flutter via
snaporcurl. If we need a specific Flutter version, then we will need to retrieve the correct binary to install; - Edit the
PATH; - Running
flutter doctorand making sure we fix any outstanding issues before running the application; - We will then have a specific setup for each platform, such as installing Android or a series of tools to compile for Linux.
This series of steps can be time-consuming to create, tinker, debug, and get right to be able to use Flutter. Thankfully, Alif Rachmawadi, also known as subosito, created a GitHub Action that allows us to easily configure a Flutter installation by defining its version, channel, and architecture:
- name: Install Flutter
  uses: subosito/flutter-action@v2
  with:
    flutter-version: '3.7.11'
    channel: 'stable'
    architecture: x64
- With
uses, we are using a specific GitHub action and declaring its version -subosito/flutter-actionwith version2; - In the
withpart, we configure the action. In this case, we are defining aflutter-version,channel, andarchitecture.
Like a library, this step is importing and performing all the actions needed to install Flutter in our Actions environment, allowing us to access both flutter and dart commands, which can be used to, for example, output the current Flutter version.
- name: Flutter Version
  run: flutter --version
This means we can now finally create our integration flows for our repositories.
Planning and defining an automation flow
When defining a plan for code integrity, we prioritize ensuring that every new line of code created adds value to the codebase and does not break existing flows. Of course, this vague statement can mean different things for different teams of developers, but we can create a few guiding principles that we want to always abide by when creating a PR.
- All our code is formatted correctly and has no errors If we always merge PRs in which our code is formatted correctly, we reduce the risk of having conflicting changes when merging code from different developers. As an example, the following two snippets of code represent the same code, with the first one not being formatted and the second one formatted
class _MyAppState extends State<MyApp> {
  @override
  Widget build(BuildContext context) {
    return MaterialApp(
      home: Scaffold(
        appBar: AppBar(
          title: const Text('Plugin example app'),),
        body: CenteredText(
          key: const Key('mainapp'),
          content: 'Platform: ${html.window.navigator.platform}\n',),),);
  }
}
class _MyAppState extends State<MyApp> {
  @override
  Widget build(BuildContext context) {
    return MaterialApp(
      home: Scaffold(
        appBar: AppBar(
          title: const Text('Plugin example app'),
        ),
        body: CenteredText(
          key: const Key('mainapp'),
          content: 'Platform: ${html.window.navigator.platform}\n',
        ),
      ),
    );
  }
}
Suppose a new PR adds code in this Widget and formats it. In that case, it can cause conflicting changes if multiple developers work on this Widget. It also increases the review time since we need to verify if it was only a format or if there are any other meaningful changes.
After correctly formatting the code, we can run our Dart Lint Analysis to verify if our codebase has no compile-time errors or warnings. Here, we see the importance of choosing the correct rules for a good static analysis, where we can either import the recommended rules or add our own in the analysis_options.yaml file.
In Dart, two different commands can help us verify this.
dart format . --set-exit-if-changed
This command attempts to format all of the code in the current directory, ., and the --set-exit-if-changed flag throws an error if there are any changes to the codebase.
dart analyze .
Analyzes our code and throws an error if there are any errors or warnings. We can change this behavior with the --no-fatal-warnings, which allows warnings, or --fatal-infos that throws an error even for info statements.
- Our changes should not break new or existing tests If a change in code breaks existing tests, it means that the requirements changed, the tests weren’t updated, or there were unintentional side effects that need to be fixed. This shows the importance of working towards testing the most critical flows of the application to certify its integrity, which leads us to the two optional requirements.
For Widget and Unit testing, we only need to run the test command for Flutter:
flutter test
But, if we have tests that depend on io and html, we might want to divide them into different folders and use the platform flag to specify the platform.
flutter test test/html --platform chrome
The previous command runs all the tests in the test/html platform with a headless Chrome browser.
- (Optional) Minimum Code Coverage Testing is either a fantasy in some companies or a hard truth that developers must actively work on, even to integrate new code into the app. Although it’s outside of the scope of this article to discuss if minimum code coverage is the best way to ensure that testing is added to the codebase, it is a code metric that shows us the percentage of code being tested, meaning that (in theory), if the percentage becomes too low, we are not adequately testing the codebase. Therefore new tests must be added to the codebase.
There are different ways that we can get the code coverage, such as using the coverage package by the Dart Dev Tools team.
- (Optional) Building the application As a final step to ensure code integrity, we can verify that our app can compile for all the different platforms. This shows us if a specific plugin or native platform configuration is causing issues not caught when the Widget or Unit tests the application. However, we must be mindful of when we are going to verify these requirements since it is the one that can take more time, and we can easily cap our free minutes per month of GitHub Actions (or usage of any other CI pipeline).
Building an application can be very different depending on the project, but in general, we define a platform/artifact type, a flavor, and any needed environment variables.
flutter build appbundle --flavor=dev --dart-define=HOST=https://gpalma.pt
Although we can add even more validations, these can be a good start to add to our pipeline. Eventually, suppose we see specific errors added to our codebase that we can catch with a different type of analysis or automation. In that case, we add them to our pipeline at that time.
Creating our First Jobs
We have all the pieces to build our puzzle - we know how to create automation with GitHub Actions, we know how to set up Flutter, and we know the different validations we want. We will only explore two validations for brevity - analyzing our code and running tests.
Since analyzing and testing are two different scopes. Still, under the umbrella of validating our application, we will create one workflow file with two jobs: analysis and widget-tests.
# The name of the workflow
name: first-test

# The event that triggers the workflow
on: [push]

jobs:
  analysis:
    # The name of the job
    name: analysis
    runs-on: ubuntu-latest
    steps:
      # steps
        # The name of the job
  widget-tests:
    name: widget-tests
    runs-on: ubuntu-latest
    steps:
      # steps
For the first job, analysis, we need to set up the Flutter framework and run the commands discussed in the previous section. But, since our codebase uses build_runner, we have the additional step of generating all the files before being able to analyze our code:
analysis:
  name: format
  runs-on: ubuntu-latest
  steps:
    - uses: actions/checkout@v3
    - name: Install Flutter
      uses: subosito/flutter-action@v2
      with:
        flutter-version: '3.7.11'
        channel: 'stable'
        architecture: x64
    - name: Check Code Format
      run: dart format . --set-exit-if-changed
    - name: Generate code
      run: dart run build_runner build
    - name: Analyze code
      run: dart analyze .
We can efficiently perform any shell command with a series of run statements.
Using the same logic, we can now run tests for our application in the widget-tests job:
widget-tests:
  name: widget-tests
  runs-on: ubuntu-latest
  needs: analysis
  steps:
    - uses: actions/checkout@v3
    - name: Install Flutter
      uses: subosito/flutter-action@v2
      with:
        flutter-version: '3.7.11'
        channel: 'stable'
        architecture: x64
    - name: Generate code
      run: dart run build_runner build
    - name: Run tests
      run: flutter test
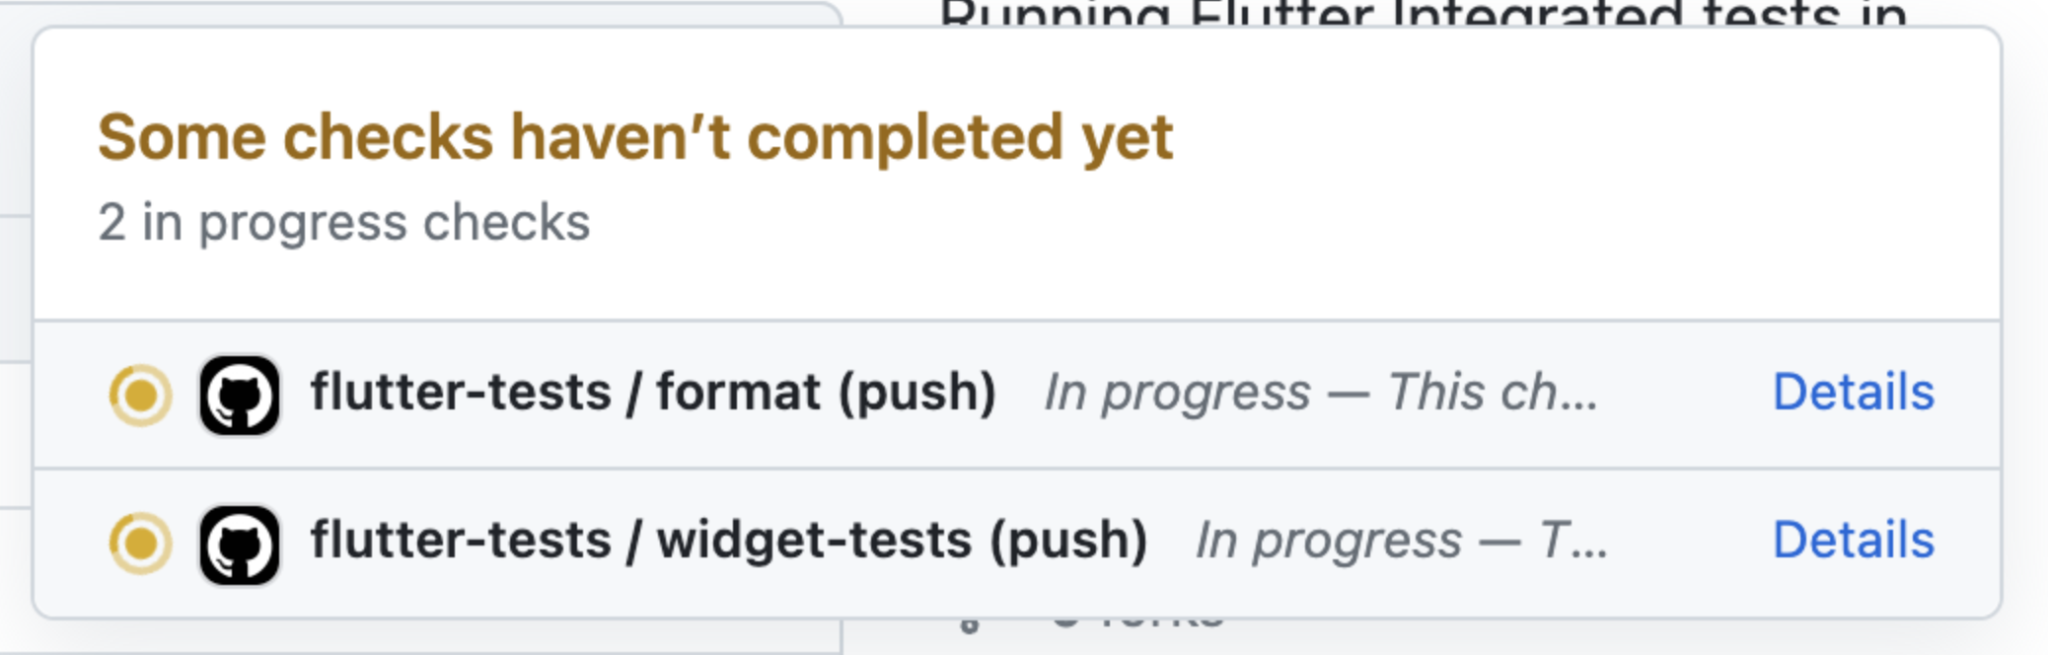
When we push our code to GitHub, we see that next to our commit hash, we have a yellow dot, as seen in the following image.

If we click on it, the workflow file defines the workflows with the format workflow-name/job-name.
We can also click on the “Actions” tab on our repository to see a complete list of all the workflow runs:
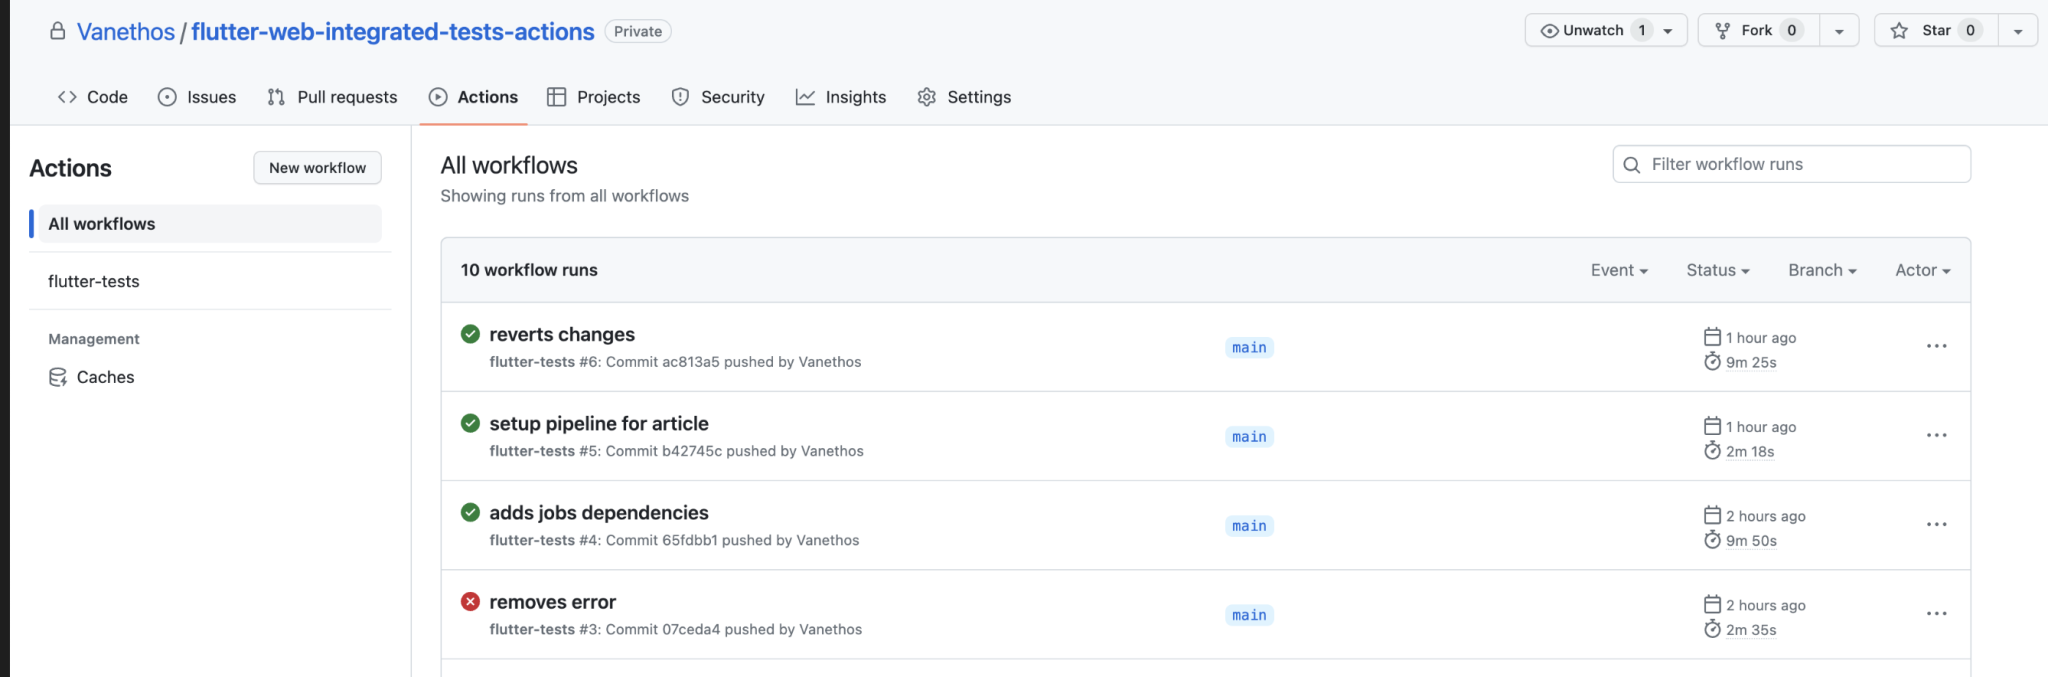
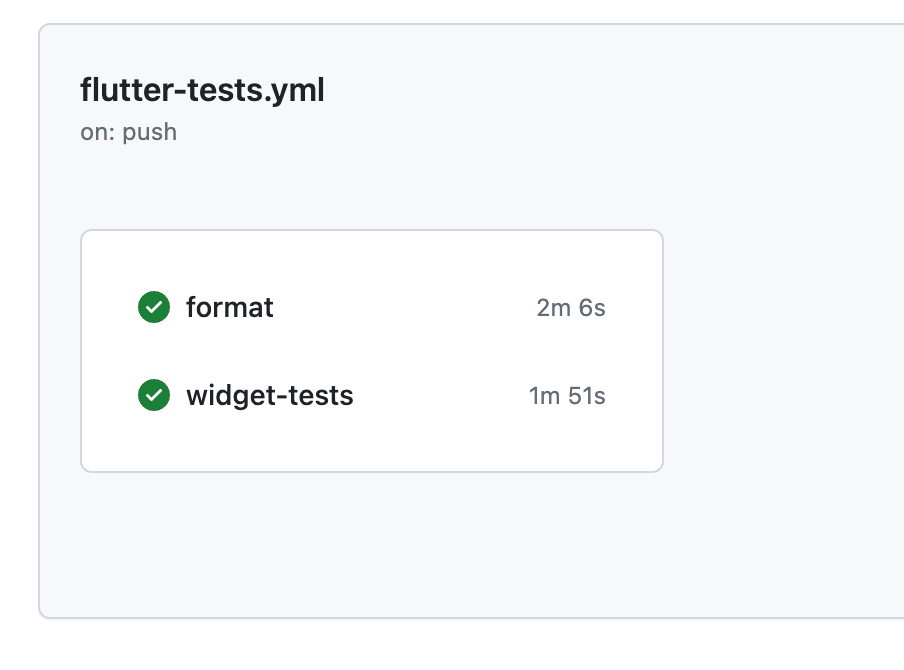
And clicking on one of them will display the status for the run, alongside what jobs are currently in progress, have failed, and were successful.
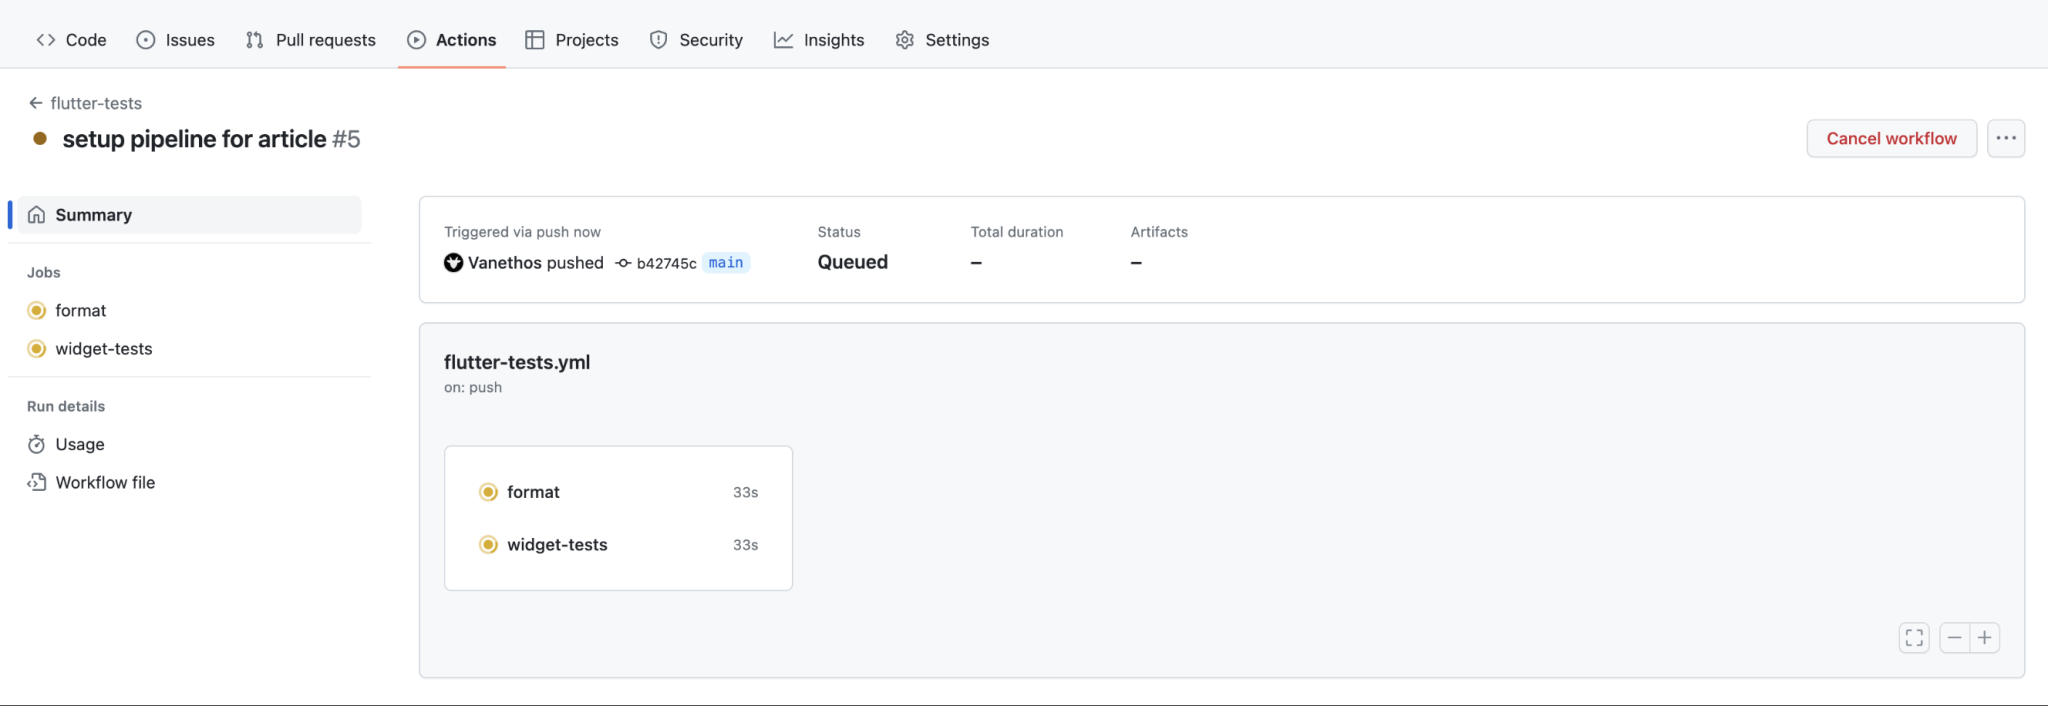
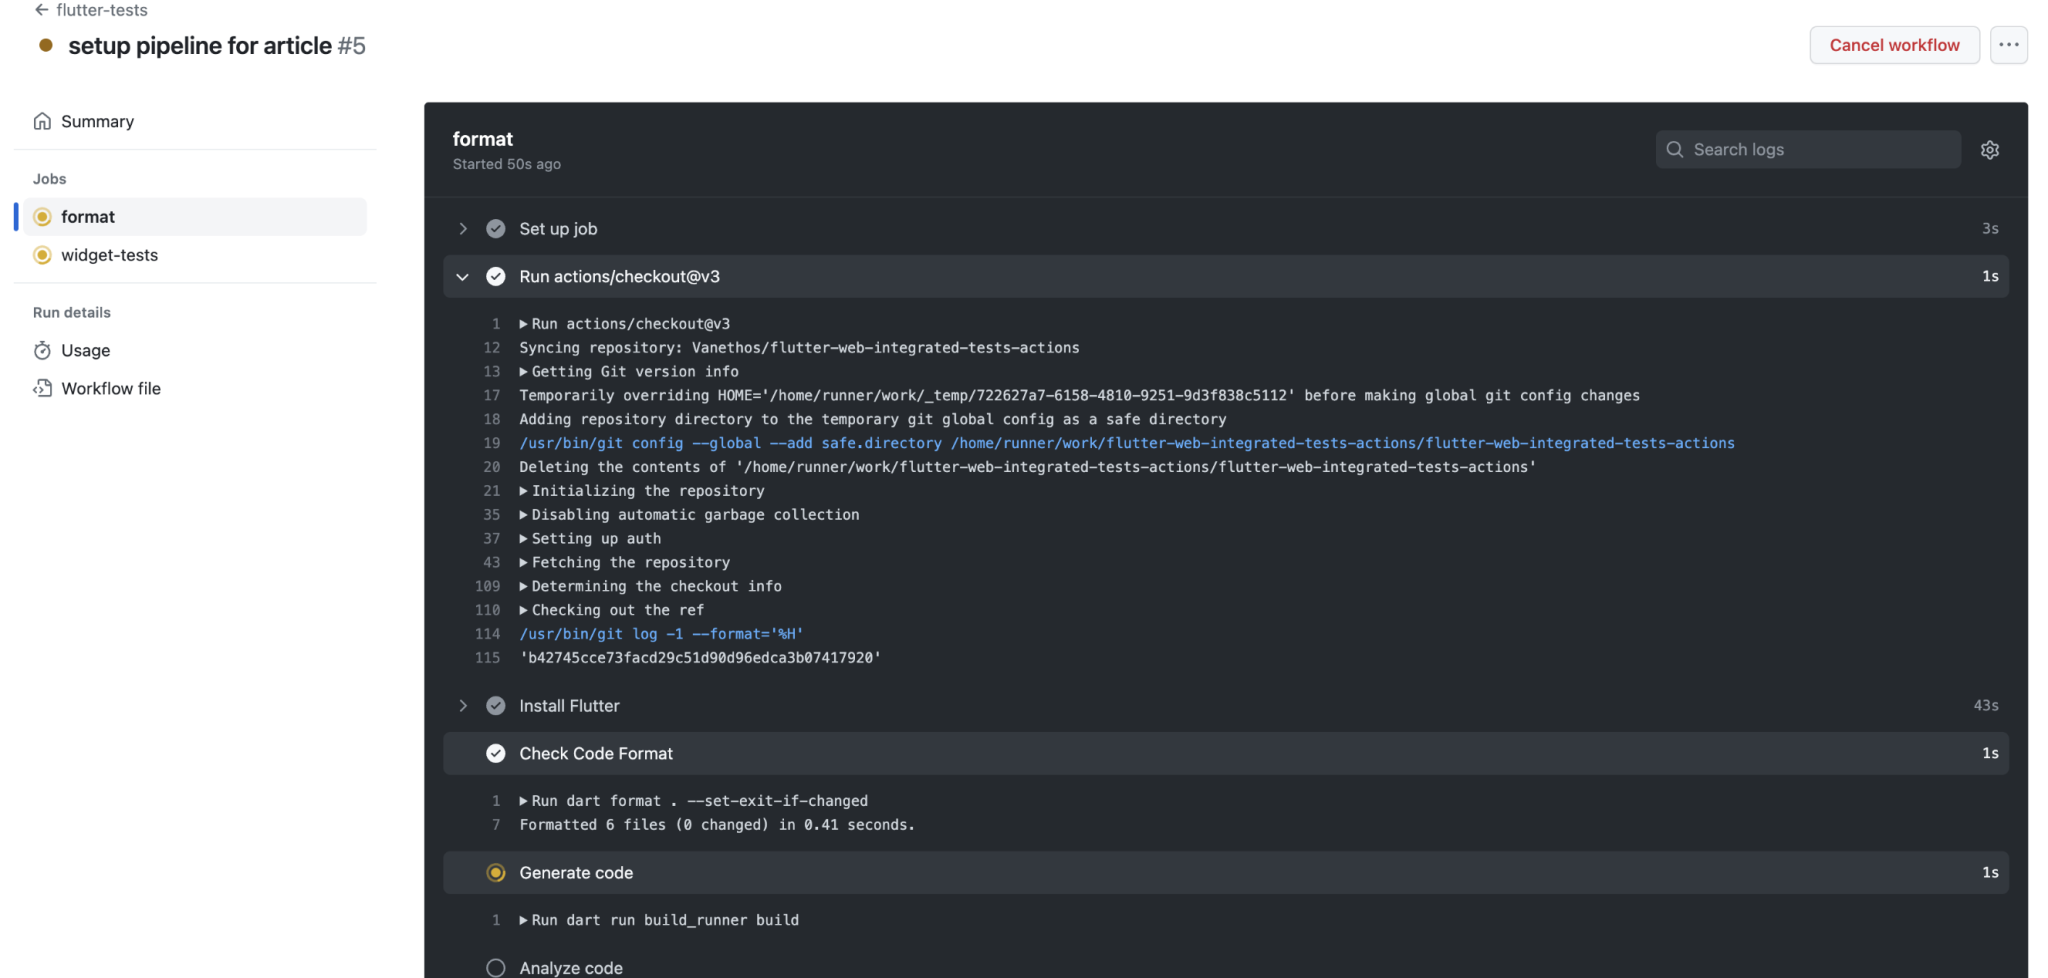
Finally, clicking on each job displays the logs for each step alongside its status. We can collect the necessary information to amend our current workflow code when a step fails.
Job Dependency
So far, both jobs were running in parallel, which means that if one of them fails, it would not affect the execution of the other job. But sometimes, that may not make sense. For example, if our code is not properly formatted, does it make sense to run Widget tests? Maybe not, since it would be a waste of execution minutes from GitHub actions because we would always need to make changes to that PR before continuing.
It would make more sense to perform the widget-tests job only if the format job has been completed and successful. Thankfully this can be done by specifying the needs parameter of a job, where we can state what job is required to be completed before continuing.
  widget-tests:
    name: widget-tests
    runs-on: ubuntu-latest
    # Adds dependency on analysis:
    needs: analysis
    steps:
      - uses: actions/checkout@v3
      - name: Initialize Flutter
        uses: ./.github/actions/initialize-flutter
      - name: Run tests
        run: flutter test
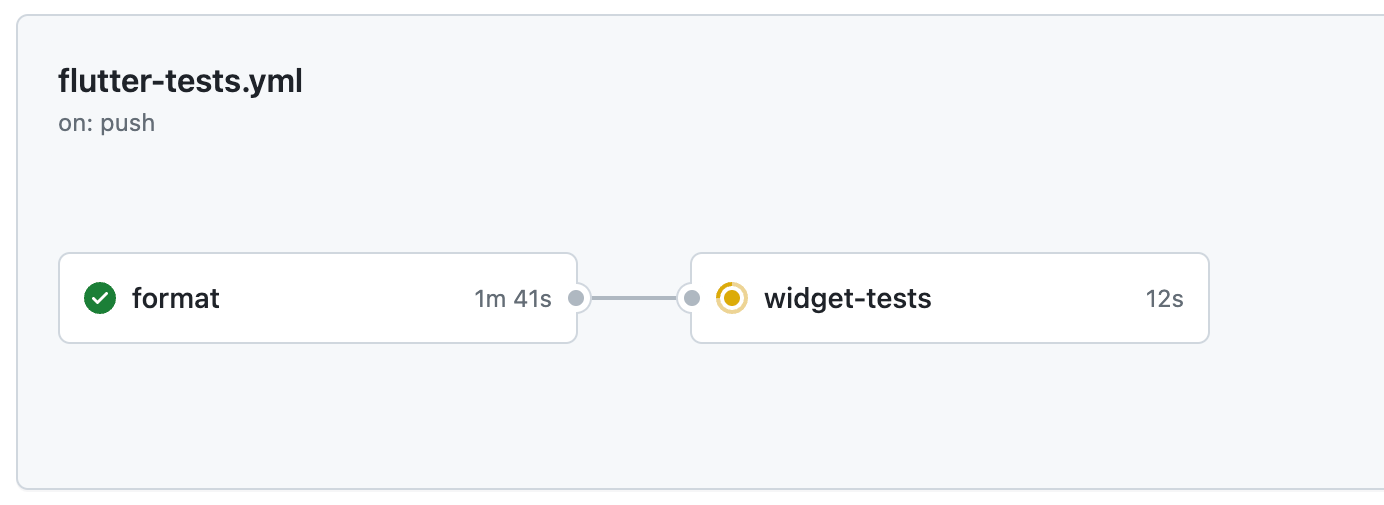
If we trigger another workflow by making a new commit, we will see that the jobs graph has now changed, showing each job in a card with a connecting line. Furthermore, the widget-tests job only starts after the format one is completed and successful.
Code Generation
We reach a point when developing the app where we need to use a library that generates Flutter code for us, such as json_serializable, meaning that we will need to use build_runner library to generate it. The generation needs to be done in every action, since per the decision of our superiors, all .g.dart files are not going to be committed in the repo.
This creates a new problem - all jobs that we introduce in the workflow will need to have a new step for the code generation:
name: flutter-tests

on: [push]

jobs:
  analysis:
    name: format
    runs-on: ubuntu-latest
    steps:
      - uses: actions/checkout@v3
      - name: Install Flutter
        uses: subosito/flutter-action@v2
        with:
          flutter-version: '3.7.11'
          channel: 'stable'
          architecture: x64
      - name: Check Code Format
        run: dart format . --set-exit-if-changed
      - name: Generate code
        run: dart run build_runner build
      - name: Analyze code
        run: dart analyze .
  widget-tests:
    name: widget-tests
    runs-on: ubuntu-latest
    needs: analysis
    steps:
      - uses: actions/checkout@v3
      - name: Install Flutter
        uses: subosito/flutter-action@v2
        with:
          flutter-version: '3.7.11'
          channel: 'stable'
          architecture: x64
      - name: Generate code
        run: dart run build_runner build
      - name: Run tests
        run: flutter test
If we review closely the code, we see that there are two steps (apart from actions/checkout) that are common in both jobs, the installation of Flutter and generation of new code:
  - name: Install Flutter
	uses: subosito/flutter-action@v2
	with:
	  flutter-version: '3.7.11'
	  channel: 'stable'
	  architecture: x64
  - name: Generate code
	run: dart run build_runner build
For two jobs, it might be easy to copy and paste code. But what if we need to do this for 20 different jobs? And what if in the future the step to generate code needs to have a different command or more arguments? This would mean we’d have to go to each job, replacing the lines for the command which is both time-consuming and error-prone. A much better solution would be to find a way to reuse these lines of code, which we can thankfully do with Composite Actions.
Composite Actions allow us to stipulate a series of steps that are going to be performed inside a workflow. Since they can be reused across different workflow files, they are going to be created in an actions folder that lives inside .github, alongside our workflow folder. Every time we want to create a new reusable action, we create a new folder with the action’s name on the .github/actions folder and create actions.yml file inside it where we put the reusable code.
.github
├── workflows
│   └── flutter-tests.yml
├── actions
│    └── workflows
│        └── initialize-flutter
│              └── action.yml
...
Inside this action.yml file, we add the series of steps we want to perform:
name: "Init Flutter"
description: "Initializes Flutter repo"
runs:
  using: "composite"
  steps:
    - uses: actions/checkout@v3
    - name: Install Flutter
      uses: subosito/flutter-action@v2
      with:
        flutter-version: '3.7.11'
        channel: 'stable'
        architecture: x64
    - name: Generate code
      shell: bash
      run: dart run build_runner build
One of the key differences here, is that every time that we are using a Shell command, we will need to specify the shell: bash parameter, as we see in the Generate code step.
Then, we can can call this action by providing its path with the uses key, as we would with any other action we get from the GitHub Actions Marketplace.
  analysis:
    name: format
    runs-on: ubuntu-latest
    steps:
      - uses: actions/checkout@v3
      - name: Initialize Flutter
        uses: ./.github/actions/initialize-flutter
      - name: Check Code Format
        run: dart format . --set-exit-if-changed
      - name: Analyze code
        run: dart analyze .
Now, every time we need to add a new job, we need to add one step to the workflow to set up Flutter and generate all the necessary code, and at the same time, we have only one file where we can manage this setup code.
Deployment and Secrets
The final piece of the puzzle is to have a way to deploy our applications to our users. Since this app in the future will have Firebase in it, we decide to use Firebase Hosting. However, to deploy the app, we will need to have a FIREBASE_TOKEN that is retrieved via the firebase login:ci command, and is highly sensitive, since everyone that has access to it could potentially deploy a new application to our domain.
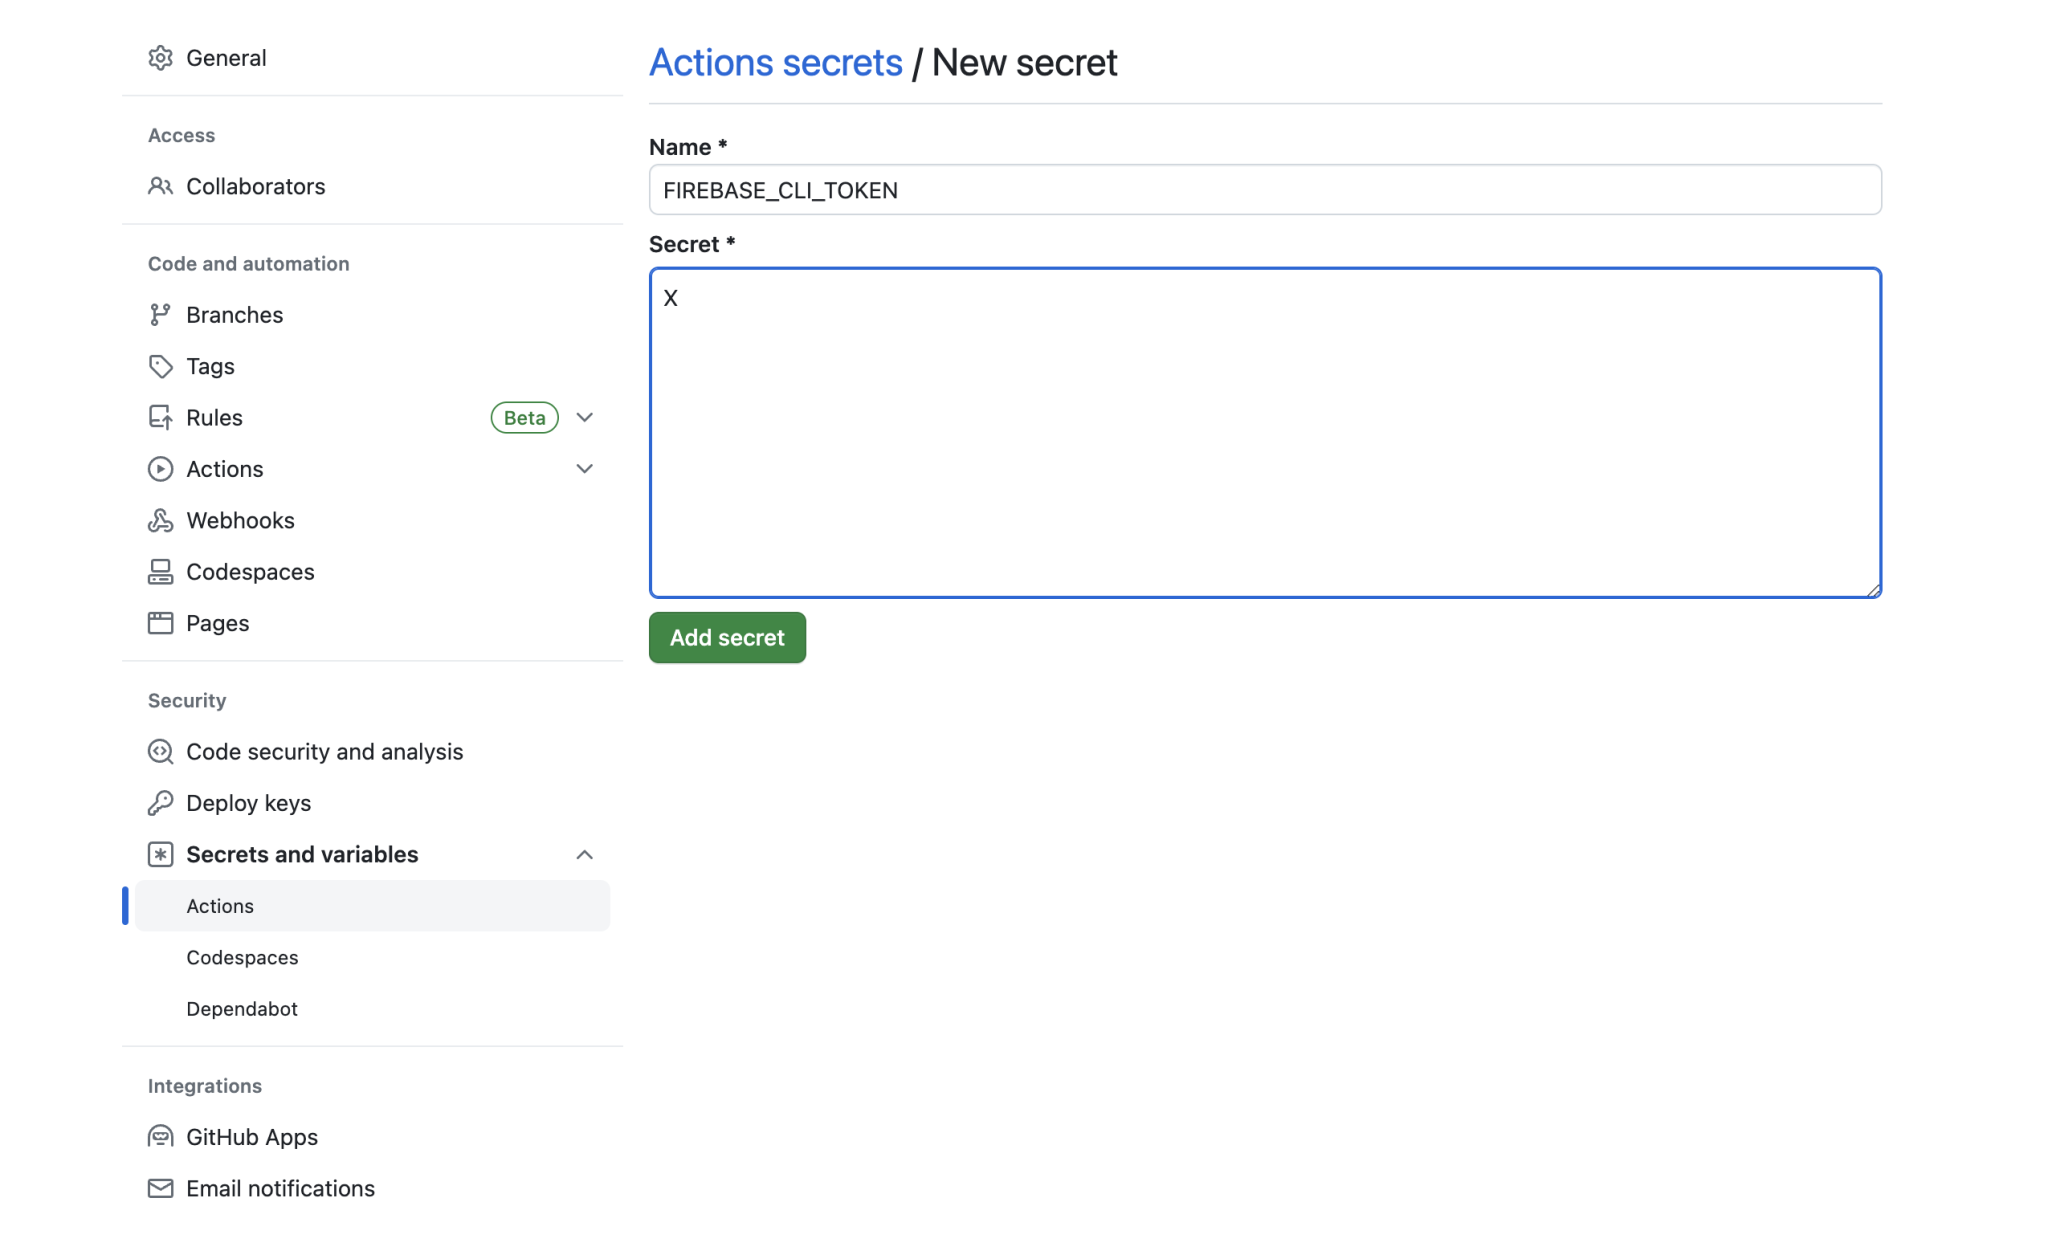
Thankfully, GitHub has a way for us to manage different secrets to be used in GitHub Actions in the Settings > Secrets and Variables > Actions settings.
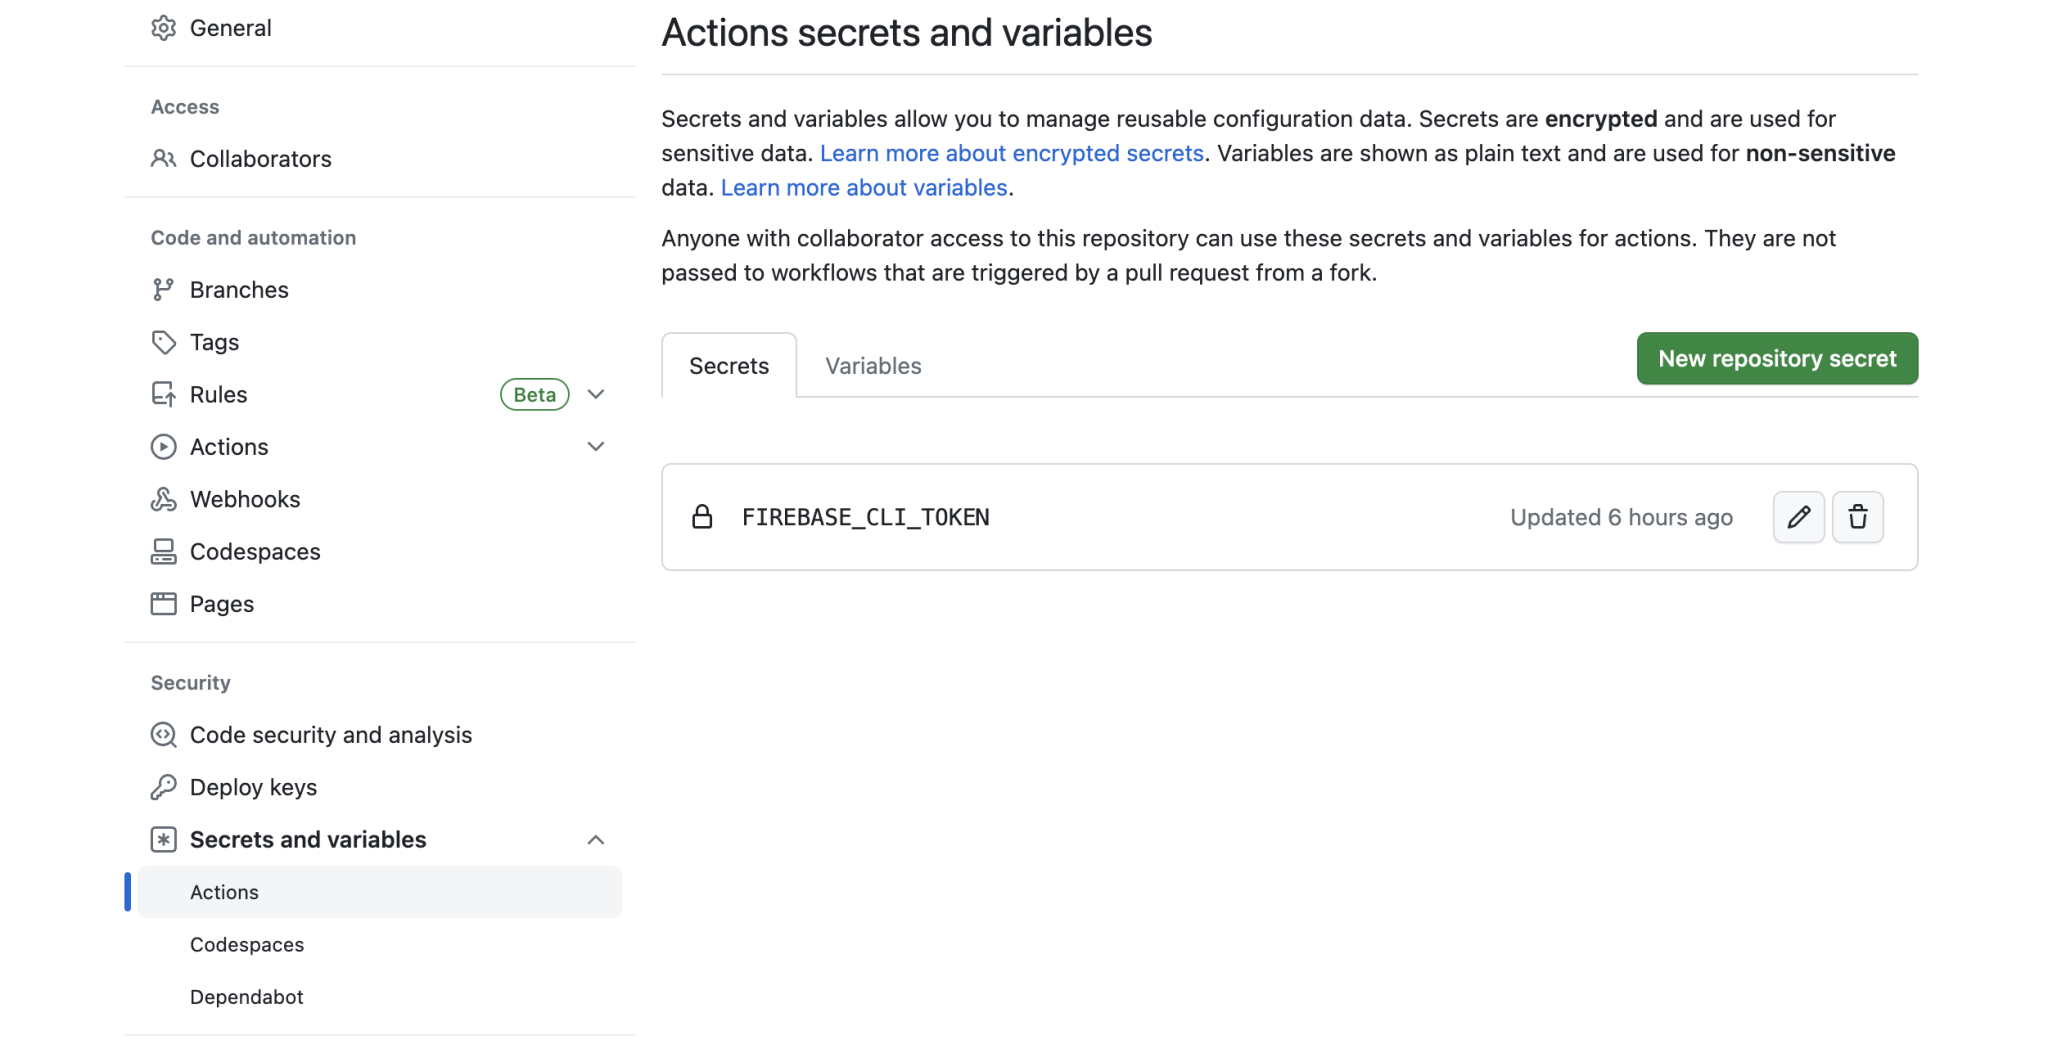
By clicking on the New repository secret, we can assign an environment variable name and a corresponding value, which we can then use in our actions.
As with the Flutter installation, we will need to think about how to set up the Actions environment in order to be able to use the firebase command.
The first thing is to be able to build the Flutter application, which we can do by reusing part of the code on the analyze and widget-tests jobs. Then, we will need to:
- Install
nodeto accessnpm; - Install the
firebaseCLI; - Use the
firebase deploycommand with our token to deploy a new version of the app.
For the last step, we will need to retrieve an environment variable with the value for the FIREBASE_CLI_TOKEN secret, which can be done via "${{ secrets.FIREBASE_CLI_TOKEN }}", where ${{ }} means that we are going to retrieve a variable which in this case is the repository secrets.
Finally, as before, it only makes sense to deploy our application after all different validations are done. In the case of the current app, we decide to analyze our code, test it, and try to build it once before attempting to deploy it.
With all that said and done, we can write the deploy job:
jobs:
  # ...
  deploy:
    name: deploy-flutter-web
    runs-on: ubuntu-latest
    needs: [analysis, tests, build-web]
    steps:
      - uses: actions/checkout@v3
      - name: Initialize Flutter
        uses: ./.github/actions/initialize-flutter
      - name: Building app
        run: flutter build web --dart-define="ENV"="dev"
      - name: Setup node
        uses: actions/setup-node@v3
        with:
          node-version: 18
      - name: Install Firebase
        run: npm install -g firebase-tools
      - name: Deploy
        run: firebase deploy --token "${{ secrets.FIREBASE_CLI_TOKEN }}"
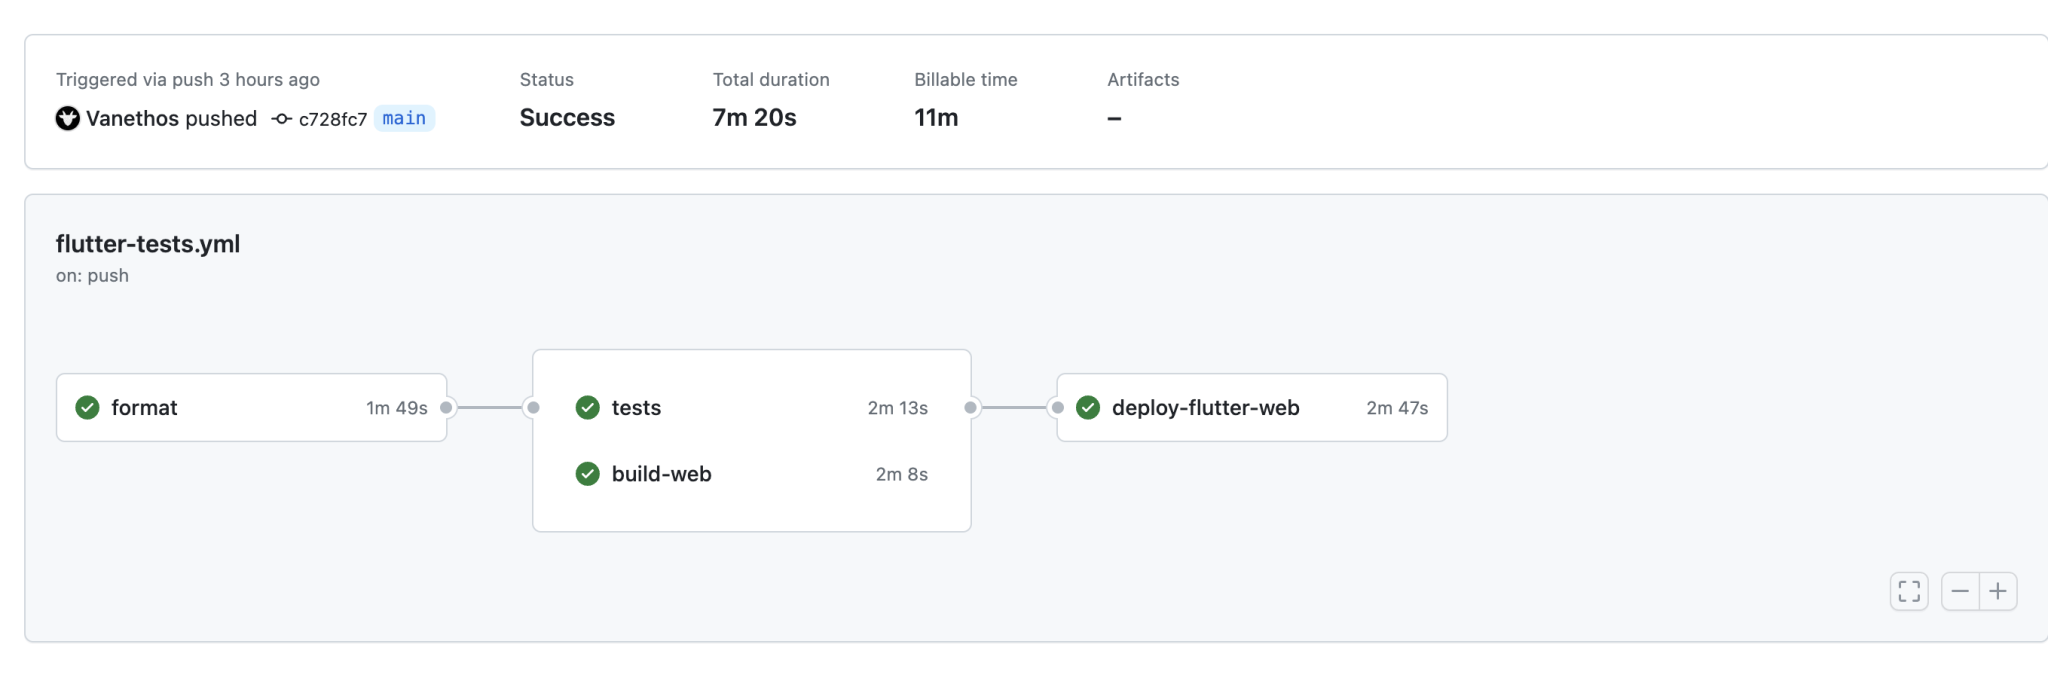
This effectively deploys the application with Firebase Hosting and changes our GitHub Actions workflow graph to show the dependencies between each sequential job.
Conclusion
When creating a product with minimum quality standards, there will be a handful of tasks that we will perform constantly. Thankfully, automation can be a critical component that helps us gain confidence in our codebase. Although there are different solutions, GitHub actions give us freedom and customize how we want to create our validation workflows. We can check the formatting and errors of our code, test it, and build and deploy the application.
However, there are still a lot of topics to explore within GitHub Actions that can lead to interesting scenarios, such as only running expensive jobs when a PR is approved, automatically creating a git tag, and creating CHANGELOG notes every time we merge to a specific branch or even using a webhook to send a message to Slack when a specific condition is met.
This is only one piece of the puzzle of managing large-scale applications or open-source projects, in which different contributors come and go, and we want to ensure the code standards are kept. We also need to define a proper git branch management structure, and code architecture, create proper tests, and document code when needed, which is a topic for another article series.
Originally published at Invertase - GitHub Actions – Ensuring Quality in our Flutter Codebase.
Want to get the latest articles and news? Subscribe to the newsletter here 👇
And for other articles, check the rest of the blog! Blog - Gonçalo Palma